FINISHING TWIST BARRELS
G Grade Lefever
Beautiful Pattern
Beautiful Pattern
Finished by Steve Nelson
Beautiful Pattern
Beautiful Pattern
Beautiful Pattern
.JPG/:/cr=t:26.83%25,l:0%25,w:100%25,h:55.1%25/rs=w:388,h:194,cg:true)
Finished by Steve Nelson
Parker Barrels
Beautiful Pattern
Remington Barrels
.JPG/:/cr=t:17%25,l:0%25,w:100%25,h:75.21%25/rs=w:388,h:194,cg:true)
Finished by Steve Nelson
Remington Barrels
Remington Barrels
.JPG/:/cr=t:17%25,l:0%25,w:100%25,h:75.21%25/rs=w:388,h:194,cg:true)
Finished by Steve Nelson
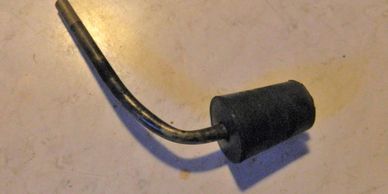
Barrel Plugs
The process of bringing out the pattern in twist barrels always involves etching. For that reason the bores need to be plugged.
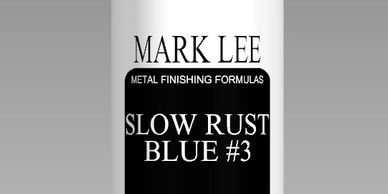
Mark Lee Slow Rust #3
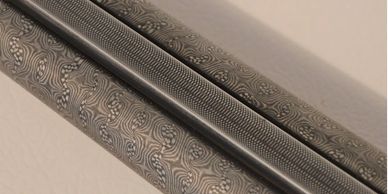
Usually I use my Slow Rust #3. Damascus barrels are very time consuming but the results can be beautiful as you can see by Steve's examples
SLOW RUST #3
Twist Barrels
The object is to make the pattern of the twist barrels show a vivid contrast. Rust bluing or browning will be one solid color unless special procedures are followed. This method works by stripping or loosening the color produced by bluing or browning using an etchant. (Ferric Chloride Solution) The rust is removed easier on the harder steel used in the twist pattern.
METAL PREPARATION
What you will need:
*abrasive paper (preferably cloth backed) 120-400 grit
Remove pitting with files and or abrasive paper. Your metal preparation will probably begin with a coarse grit abrasive paper, but should be completed by using 320-400 grit.
DEGREASING
What you will need:
*detergent (Simple Green)
*scrub brush
*tongs or wire hooks
*air compressor or paper towels
*clean cotton gloves
*rubber stoppers for plugging barrels with bent stainless tubes to allow for expansion
APPLICATION
What you will need:
*vinyl or latex gloves
*cotton gloves
*natural sea sponge, cellulose sponge, or cotton swabs
*small glass or plastic container
*oil free steel wool
*container for etchant (Ferric Chloride Solution) to dip plugged barrels (plastic tray)
*tank for boiling distilled or deionized water
*humidity box
*etchant (Ferric Chloride Solution) check internet
*safety glasses or goggles
*baking soda
Apply a coat of Slow Rust #3 diluted 2 parts of distilled water to 1 part Slow Rust #3. Apply as evenly as possible using a sponge cut into a 1 inch square. Place barrel in a humidity box at 90 deg. F. and 60 % humidity until covered with a coat of rust. Different temperatures and humidity will work but rusting times will vary. (1/2 hour to 5 hours) Remove barrel from the humidity box and dip in the Ferric Chloride etchant for 5 seconds. Dip in room temperature water and rub with oil free steel wool under water. Dry the barrel and apply a coat of Slow Rust #3. The application should always be done at room temperature. Dip in etchant after each rusting cycle. The pattern should become more vivid with each sequence. It could take 15 sequences to get what you want. After you are satisfied with the pattern soak for 5 minutes in a saturated solution of baking soda and water to neutralize any acid residue. If a darker plum brown is desired barrel can be boiled in water and removed when the desired darkness is achieved. If a black and white pattern is desired boil in water after every rusting operation. Apply Rig gun grease and set aside for 24 hours to cure. Some finishers also apply a coating of wax or lacquer to the finished barrels.
TIPS
If you buy Ferric Chloride Solution 35% dilute this solution 8 parts of distilled water to 1 part Ferric Chloride Solution. If this solution removes the color too easily it can be diluted further or strengthened if necessary.
Rubber stoppers are needed to keep the etchant from getting inside the barrels. Chemical stoppers with a hole work well. Stainless tubes inserted in the stoppers can be bent to stay above the solution. Do not attempt to use solid stoppers as they will blow out in hot water.

EXPRESS BROWN #2
Use the instructions from Slow Rust #3 but for the rusting operations use Express Brown #2. Apply heat when using Express Brown #2 as with normal browning instructions for Express Brown #2.

METHOD USED BY STEVE NELSON
BLACK AND WHITE FINISH
MATERIALS
*distilled water
*bluing solution (MARK LEE SLOW RUST #3)
*steel wool or Scotchbrite pads (white)
*Ferric Chloride annhydrous (FeCl3) 1/4 cup to 1 gallon distilled water
*Logwood (Hematoxylin) teaspoon to 1 1/2 gallons distilled water
*Copper Sulfate (CuSO4) 1/2 cup to 2 gallons of distilled water
DEGREASING
Scrub with Simple Green or Super Clean under hot water. Dry and then do not touchwithout clean gloves.
RUSTING PROCESS
Using a sponge or swab wipe the barrels in even swipes end to end with Slow Rust #3 Solution. Put in a damp box and allow to work for 20-30 minutes. Check the barrels periodically until a fine coat of rust forms. Remove from the box and boil in distilled water for 5 minutes. Remove and allow barrels to cool to room temperature. I also make a habit of running a clean patch through the bores to remove any moisture. Tightly plug the barrels with rubber plugs. Using a strong wire attached to the loop or hook on the barrels dip them in the Ferric Chloride Solution for 5 seconds. Remove and immediately rinse in clean water. Remove the rubber plugs and card off the rust with steel wool or Scotchbrite pad under running water. Dry barrels and run a clean patch through the bores. At this point I card the barrels with a .003 steel wire wheel to burnish the surface. Repeat the rusting process.
The dip in the Ferric Chloride Solution will strip most of the oxide from the metal but it will remove more from the harder steel than from the softer iron areas. Gradually the pattern will become more visible. Most of the time I have a good pattern after 15-20 coats.
When you are satisfied with the pattern, you can darken it slightly by boiling barrels in Logwood. followed by a 30 minute soak in room temperature Copper Sulfate Solution. WARNING: IF there are ANY leaks between the barrels and the ribs this stuff will get inside and will pit the barrels very quickly.
(Note from Mark Lee: I have never used the Copper Sulfate in this way.)
NEUTRALIZE
Soak the barrels in a saturated baking soda and water solution for a couple of hours to neutralize any of the acids. Finally I soak the barrels in oil overnight.
TIP
For browning damascus skip all the boiling steps and the final Logwood and Copper Sulfate steps.